Not only did I not get compensated for this review, it cost me a whole glass of diet coke and some elbow grease………let me explain:

This is what it looks like when you take everything out – a little more ominous, but maybe not so bad.

That pile of what looks to be about 100 short black sticks is actually only 8 very long sticks that assemble in the same way the new tent poles come together. They are strung together with an elastic rope and they simple straighten out and clip together. They were easy to put together – about 1 minute to get to this:

I know now that this first easy step is just to build your confidence. I thought to myself - “This isn’t going to be so bad," as I noticed my freshly poured diet coke sitting on the table next to me. Note to self, when you think you should probably get something out of the way – DO IT.
The next step of the instructions is to slide the poles into the four sleeves around the edges of the flannel. The first one goes in, no problem. Just like putting a curtain on a curtain rod. The second one is a little more difficult, as I have to control the first rod. The third one is starting to get a little crazy, with the first two plopping rods around the room. I won’t be hard for you if you have eight arms though.
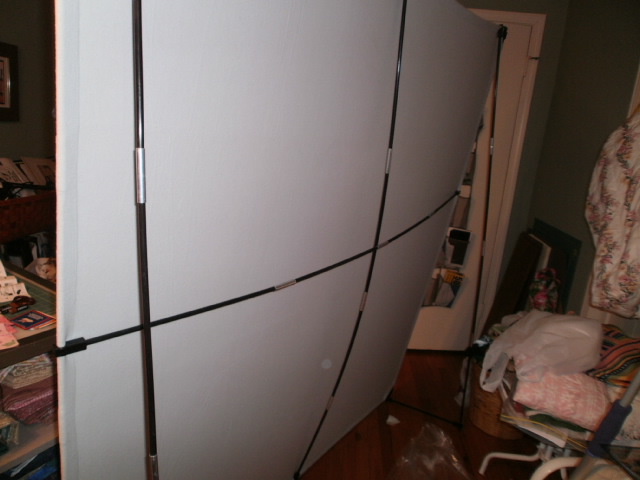
I began this process in my sewing room, which isn’t particularly small, but it is a little crowded. My hopes was to be able to assemble it in my sewing room as that is where I was going to use it. Also, my thought behind the portable design wall is to be used by those who don’t necessarily have a lot of space. Well, it is very difficult to accomplish in a tight space. (Please note, the diet coke is still standing, I am thirsty, but I put off taking a drink because I want to get this wall put together.) I finally managed to get all four sides of the wall into the sleeves. The next step is to insert the corner brackets, which stabilize the four side poles into a solid square. Well, this whole scene is looking more like the assembly of a 12-man tent, than simple square frame. Just as I got one corner on and moved to the next corner, the prior corner would fall off……you get the picture. I managed to get the whole square put together even with it flopping around the room and my diet coke survives! The next step is to attach the two cross poles to the back. As I pick up the first cross pole and swish it around to put it on the back, you know what happened (warning the following photo is graphic):
 |
| “It can’t be that hard” – said the naive non-camper watching a movie with Dad leading the family in a disastrous attempt to assemble the tent. |
After cleaning up the diet coke, and narrowly missing my lamp and ceiling fan, I decide it is time to take this circus to another room. Transporting the partially assemble wall was no piece of cake. To be fair though, it isn’t designed to be moved around in this partially assembled state. Once I got it to the living room, I was able to finalize the assembly (still very much a campsite scene) and move it to my sewing room…..TADA!

I can’t really get a picture of the whole thing as it is now really tight in my sewing room, but notice how close it comes to the ceiling!Older reviews on this design wall expressed concern over the wall knocking over and not being stable. This newer model has stabilizer bars included with it. The following picture shows the stabilizer bars at the floor. I can see how it would topple without these bars.

As I put my UFO onto the wall, it did wiggle quite a bit, but it stood its ground. The quilt square seem to stay fairly well attached. As I mentioned earlier, one thing that drew me to this was the ability to build my quilt sandwiches on this wall. Well you can also use a temporary spray adhesive to secures your squares to it as well. The flannel is completely washable.

Would I return it? Probably not. Would I buy it again? Not sure, I will let you know after I attempt my first quilt sandwich. Would I attempt to assemble it by myself again? NEVER!
Now, I am off to drink my new diet coke and finish this UFO – blendable curves technique/design by Peggy Barkle.


Too funny! What a great post! I have tried similar "I can do this myself" things. I really could visualize the whole thing. Thank you for ending my day with a smile. I have considered a design wall and will look forward to your opinion on yours Love Lois
ReplyDeletecould have been worse .. you could have poked your eye out while it was flapping ...
ReplyDeletefunny writeup , i appreciate a good laugh !
hope it will serve you well .
blessings
gab
from cyberquilters
What is your opinion of the design wall now, a few years after you wrote this review.
ReplyDeleteWhat is your opinion of the design wall now, a few years after you originally wrote it?
ReplyDelete