Monday, June 20, 2011

Mug Rug Monday - Free Motion Quilting

Today's free mug rug pattern is all about free motion quilting! If you have never done free motion quilting, or you want more practice, this is an excellent project. I started with a Mandala drawing I found online. If you don't like the one I have chosen, you can find 1000's of them just by googling the words free Mandala. First, I sized the Mandala correctly and I printed the Mandala on a plain piece of paper - this helped me know where to position the paper in the next step.
 Next, I cut a piece of freezer paper a little larger than the actual Mandala drawing. It doesn't have to be neat, just bigger.
 Next, I ironed that piece of freezer paper onto the top of the Mandala I just printed. I used a medium setting on my iron for this step.
 Here you can see the freezer paper on top of the original printout. Next, place the paper into your printer, being careful to position it so that it prints the same was as it did before - thus hitting the freezer paper target.
 You now have your design printed on the paper side of the freezer paper. Remove it from the printer paper.

 Make a quilt sandwich larger than you want your finished mug rug to be - I made mine 10 x 7. Get your machine setup for free motion quilting. [Correct foot, quilting table, threads of choice, lower feed dogs, etc.] Baste around the outer edges of the sandwich to hold it in place. While you are basting, make sure that your tension is perfect, so you don't have to worry about it when you start your free motion quilting.
 Center you freezer paper image onto your working area.
 IMPORTANT - use a pressing sheet to protect your iron.......Iron the image to your mug rug top.
Following the design on the freezer paper, begin free motion quilting through the freezer paper. Pay attention that you don't miss any spots. If you do though, you can fix it after you remove the paper if it is noticeable.

Relax and have fun with the quilting - this is a mug rug - it is a learning experience! Your thread line will NOT match the drawing exactly, but once you remove the drawing you won't know where the original drawing lines were. Use a little creative license as well, you don't have to use every single aspect of the drawing - for instance I didn't even attempt to do anything with the dots - too tedious!

If you don't believe me, take if from a professional - I took a class with Sue Nickels once and she doesn't always match the line either - and she has one some amazing quilting ribbons and prizes!
Now, wasn't that fun! Next, remove the freezer paper from you mug rug. Tear off the biggest parts first, then sit down in from of the TV with a pair of tweezers or anything else that helps you finish the task of removing the freezer paper.


When you finish picking the freezer paper off, your studio floor might look something like this. ;-)


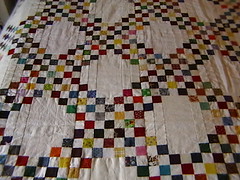
 The back of your mug rug will look something like this......


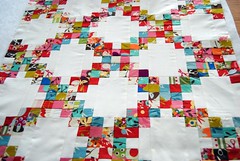
And the front might look a little like this:


Remember, these mug rugs are about building our skills. Don't write this one off until you try it! The quilting part is a lot of fun.

Until next time - Piece!
Michele Hester

Moving Day is for the Birds!

Our chickens moved into their new home today....their old one was destroyed by the tornado and they have been in a temporary home since then.We only have four chickens right now, but this new house will hold 20, so we are going to get more soon.


I think they will be quite happy here, what do you think? My parents' dog Zipper is enjoying the new entertainment!

Take a look at these amazing flowers that a friend of mine grew in her yard:


She started these amazing Hollyhocks from seed - I thought they were Peonies they are so large!


I must say, I am a little jealous - we have just started reclaiming our yard after all of the tornado and wind damage. I was finally able to cut the grass this weekend, and I still had to work around tree stumps and holes from root balls. Continue to remember those who were hit much worse than we were, life is still very difficult for them and will be for quite some time.

Until tomorrow, Piece!
Michele Hester

Wednesday, June 15, 2011

Happy Birthday to me - a day late

I am even a day late on this one! LOLYes, I am a Flag Day baby. I was kinda sad yesterday, feeling sorry for myself for getting older....I know, I know, it is better than the alternative! I did get a spectacular birthday surprise - little ole me surpassed 25,000 hits yesterday!!! WooHoo! I remember not to long ago thinking this would be so fun and so nearly impossible. Thank you for visiting and sharing my blog with your friends. I enjoy sharing with you.

Lately, I have been in a creative black hole and unable to get myself started on anything. But at least yesterday I finally got myself out of my funk and started working on a new quilt!

One traditional quilt that I have always admired is the Irish Chain, so I decided that a scrappy Triple Irish Chain this would be easy enough to make with jelly roll strips. Here are some samples of where I am going:

http://www.flickr.com/photos/40465632@N08/
http://www.flickr.com/photos/27565576@N02/

I got these jelly rolls for $5.00 each on clearance and decided to do something with them.


Yesterday I sorted out my strips and started sewing them together. Here is my progress:


What are you working on today?

Piece,
Michele Hester

Monday, June 6, 2011

Mug Rug Monday - Grow

Here is the newest mug rug created for Mug Rug Monday:


Not too long ago, one of the blogs I read had a very popular comment string where quilter’s were being asked to “vent” and say out loud things they might not normally admit to – predominantly about quilting. There were several people on there who commented on the "mug rug movement" and expressed that they didn't get why it was such a popular thing to do. They couldn’t understand why anyone would be interested in making a glorified coaster. 

For me, mug rugs are little quilts. Little quilts which require the same skills and processes as large quilts. I see them as an opportunity to try different techniques and end with a finished product rather than a mismatched UFO square to add to a growing pile. 

When completing a mug rug, I go through the entire quilt making process, but in a much shorter period of time than that required by a larger quilt. With a mug rug, I still have to make color choices, design choices, quilting motif choices, binding, etc. No part of the process is skipped. 

Another thing I like about mug rugs, is that it is also an opportunity to try out new tools. Whether they be marking tools, quilt design tools, cutting tools……..most can be used on a mug rug.

Don’t get me wrong, I know mug rugs aren’t for everyone, but don’t close your eyes to them just because you don’t get their size! Look at them as a growth opportunity in your quilting life! Grow as a quilter - this is what I had in mind when I made this week's mug rug entitled "Grow." 

A few things that I have on my list of skills to work on are free-motion writing on quilts, free motion embroidery, black outlining and perfecting my binding techniques.

For this quilt, there is no patter per se, but rather a process to follow. You will be designing your own flower motif. Start by cutting a solid background fabric approximately 7 inches by 10 inches (this will later trim down to 6.5 inches by 9.5 inches. Pick out your flower fabric and you leaf fabric. It may be harder than you think.....I had a difficult time finding just the right green to go with my orange/red graded fabric. 

Using a pencil, draw your flower onto the paper side of a light-weight double fusible stabilizer. I used "wonder-under." Note I said draw and not trace - no there is not a pattern - part of the process is to be brave and draw your own flower! Do a rough cut out of the stabilizer and iron it onto the back of your flower fabric. Now is the time to cut on the lines you have drawn. Repeat this process with several leaves. Remove the paper backing from your pieces. 

Next play with the general placement of your applique pieces. Once you have decided on your placement, iron the pieces to the background fabric.

Make your quilt sandwich and baste the layers together.

Next comes the free motion embroidery which brings details to the flowers and leaves. Then, sew your word.....you can cheat here and write the word with a water soluble marker first and "trace" it with your sewing stitches. Use a word that will inspire you! If you wish to add any more quilting, now is the time to do that.

Trim your quilt to 6.5 inches by 9.5 inches and bind. Now aren't you proud of yourself! I can understand why no one would want to put a coffee and cookie on it! Hang it on a wall if you like!

Whether you use this mug rug idea or any of my other free mug rug patterns, don't forget I would love to see your completed creations, so please send them to me. I also would love to hear what you are learning in the process of quilting! I won't post your photos without your permission.

Until next time -
Piece,
Michele Hester

Saturday, June 4, 2011

A finish!

I have completed my first blocks for my first online Bee. Each of us decided to do two blocks for our group, so we ended up with a total of 12 blocks from our bees, which will make a bed-sized quilt. The colors are chosen by the recipients, but the block patterns are chosen by the one making the block....Here are the twelve that I am sending out.

Orange/gray/white:

"I spy" - lot's to look at:


Purple/Grey/white:


Aqua/turquoise/navy/grey/khaki/white:


"Make it a rainbow" - vivid colors:


Green/brown/blue/white:


I hope that my swap partners are happy with these, it has been a fun experience for me. The chatter in our bee has been quite busy over the entire quarter.

Stay tuned - we will be back to our regularly scheduled "mug rug Monday" free mug rug pattern on Monday! We are finally recovering and getting life back to normal after the storm! Pray for those that got hit way harder than us - I cannot imagine how long it will take them to get back on their feet. The process is not fun at all.

Piece!
Michele Hester

Beautiful Classic Floral Spray - Machine Embroidery Design

Click here for machine embroidery file Watch this design come to life on your fabric canvas. This gorgeous design has been thoughtfu...