Showing posts with label Tutorials and Tidbits. Show all posts

Sunday, January 22, 2017

31 days of quilting with a walking foot (great information)


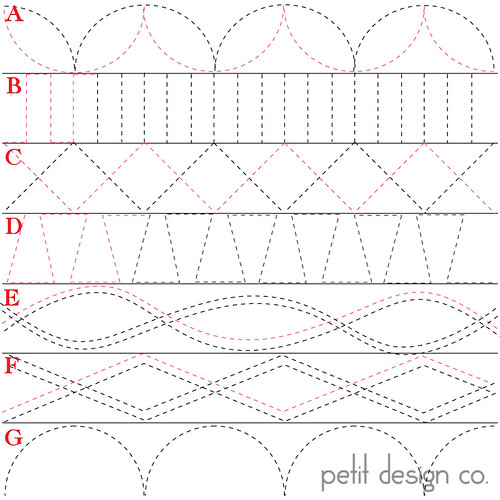
Petit Design Co has done a 31 day series on quilting with a walking foot.........think it is just straight lines? NOPE - she includes curves. There are some great ideas applicable to quilting on a longarm as well. Click here to visit the landing page with links to the 31 days......

Sunday, January 17, 2016

Sewing corner to corner NO MARKING

Whether you are joing pieces for binding, making half square triangles or snowball blocks, any time you need to sew corner to corner, this video has a fantastic tip. The video is filled with other great tips too, I just thought the last one was the best and will to be a huge time saver.


Monday, January 4, 2016

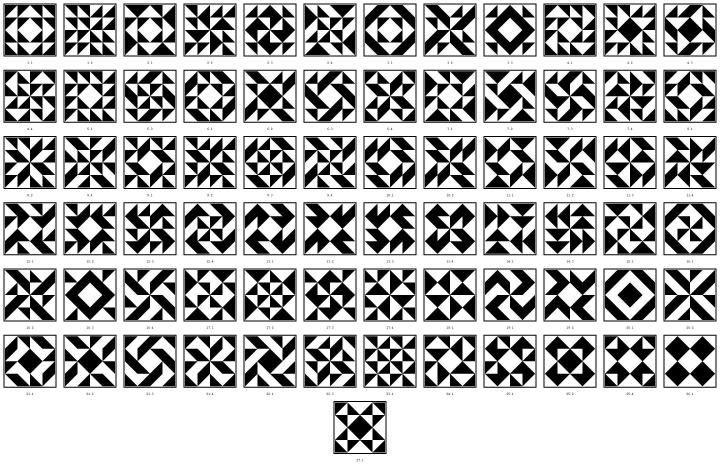
Half square triangles

CLICK IMAGE TO GO TO THE ORIGINAL SITE copyright 1994 Mark Jason Dominus
This variation of 72 different squares using half square triangles has been around for a while, but every time I look for it I have trouble, so I am posting here for you and for me!

Monday, December 14, 2015

The quilting tool you probably already own..........but didn't know about

Recently, I happened upon a very handy tool for quilting - I bet you even own one yourself! What's that you might ask? Well...........


It's a plastic serrated knife silly!

What in the world of quilting could you possibly use that for?


Why, for closing safety pins used in basting your quilt of course!

The knife slides easily underneath the pin without damaging the fabric, and without your fingers being pricked by the point of the pin. In addition, the serrated teeth grab the pin, so that it is extremely easy to navigate the closure. Try it - I guarantee it, or your money back!


OR you could spend the $8.99 suggested retail on something like this:

Money spent elsewhere = missed fabric opportunities!!!!


"Necessity is the mother of invention" - Unknown

Tuesday, September 29, 2015

Free Motion Quilting - Feathers

Sometimes free motion quilting can be so frustrating! The problem is, I am a perfectionist. I also am one of THOSE that thinks if you don't quilt your own quilt, you can't lay claim to making the quilt. WHO AM I TO ARGUE with Eleanor Burns - who "quilts with her credit card!" Problem is, my credit cards are all gone, and we live on cash only.....when I think about shelling out cash to someone else to quilt, well............I would rather buy fabric!


I have quickly gotten to the point of having several quilt tops sitting in my studio, un-quilted. I am DETERMINED to learn to quilt them myself. The perfectionist in me though, won't let me start them! This too goes against the teaching of most free motion quilting teachers....their advice is always practice, practice, practice. and even practice on real quilt tops (GASP!!!) What if I mess it up? Well, if they site there an never get quilted, what good are they anyway?!? (<---those are exclamations of ambivalence.)


I participate in a challenge recently that was all about free motion quilting feathers....who doesn't love them? I know I love them. I tried drawing them, and when you look at them at a distance, some of them weren't too bad, but again, the perfectionist in me reared its ugly head. I had to use a template. A template?! - Diane Gaudinski said we could! Okay, so she might have only mentioned templates, but I took that as complete permission.


This template is from one of my absolute most favoritist free quilting template locations.....forestquilting.com - if you haven't been there, be sure to go and collect all of their beautiful free quilting motifs. I used the one called "Feathered Heart Motif"

The pdf says it is for a 12" square, so I needed to reduce it for my 8 1/2" practice piece. To figure out how much to reduce it, I divided my square size, to get the percentage of the original size I needed to print. (The original pattern size 12 divided by 8.5 equals .67 or 67%) On my print settings, I set it to print 67% of original size.

Next, I took my quilt square, and marked the center lines, by folding and marking. I used a light box to align the center lines on my square, with the center mark on the pattern. I then traced once side of my heart. Then I flipped the pattern over, and traced the other side. Note, the disappearing ink pen disappeared too quickly, so I had to revert to the water soluble. The other neat thing about this project is learning to use all those nifty tools I have sunk a lot of money into!

I set my machine up for free motion quilting. This time I spray basted my practice sandwich, as this is a pretty complex motif and I would have a heck of a time working around pens.


I tested my machine out on scrap piece and everything worked fine.....I went to my real piece and YIKES I started having skipped stitches. Since I cleaned my machine, before I started, I knew that wasn't the issue. So, I changed needles - stitching once again worked fine on my scrap piece. Went to my real piece again - and skipped stitches!!! WTH!!!! Yes, I am using expletives, because I HATE reverse sewing.


So, to the internet I go.....since I had a new needle, my machine was clean, my tension was fine on my scrap piece, I couldn't figure out what was happening, then it dawned on my, I had a thicker batting on my scrap piece!! I found Diane's advice about skipped stitches in free motion quilting here - and made a new "scrap piece" using the same skinny batting, and voila - problem of skipped stitches solved.

Sorry for the novel here, but I had to get all that out!

NOTE BENE: this is a repost of one of my popular posts in the past. I have since purchased a long-arm, and as you can see from some of my other posts, I have gotten quite a bit of practice since this originally posted. I still think it has valuable information in it, so I wanted to repost for my new followers.

Thursday, September 24, 2015


Did you know that you can do a lot more with a walking foot than straight line quilting?


Petit Design Co has done a 31 day series on quilting with a walking foot.........think it is just straight lines? NOPE - she includes curves. There are some great ideas applicable to quilting on a longarm as well.

 Click here to visit the landing page with links to the 31 days......


Tuesday, September 22, 2015

Stitch In the Ditch Foot you probably already own.......


Do you own a blind hem foot? If so, then you own a perfectly respectable, multi-tasking, stitch in the ditch presser foot. Of course we quilters and don't do any hemming - if we can help it!

Mine looks like this:


 It has a vertical metal piece that runs through the middle down to the fabric like this:


To use it - guide the little vertical metal piece along your seam line (or in the ditch) and voila! Stitch-in-the-ditch simplified! No tugging on your fabric necessary, because that little curved piece right in the middle of where your needle goes through pushes the fabric over for you.


It almost looks like a piece of wire running through the middle in this picture:


Monday, August 26, 2013

31 Days of Quilting with a Walking Foot

Petit Design Co has done a 31 day series on quilting with a walking foot.........think it is just straight lines? NOPE - she includes curves. There are some great ideas applicable to quilting on a longarm as well. Click here to visit the landing page with links to the 31 days......

Wednesday, March 21, 2012

Quilted Bag Feet

A dear friend of mine, who is quite creative, recently came to quilt guild with a purse she made. I saw the bottom of it and HAD to take a photo to share with you! Anytime I make a fabric bag, one of my concerns is the protection of the bottom. Store made bags often have feet on them - and I am sure that you can purchase them, just like you can other purse hardware. BUT look at this clever idea my friend had:

It was a very cute bag, and I apologize for not getting more pictures, but I was so darned excited about the buttons, I spent too much talking about them and got distracted from getting the pictures. You can sew the buttons on by machine, if you do it before you construct the bag, but the cool thing is, you can add them at any time after creating the bag.....like now!!! - do you have a defenseless quilted bag walking around without any feet?

Monday, February 27, 2012

Free Motion Quilting - feathers

Sometimes free motion quilting can be so frustrating! The problem is, I am a perfectionist. I also am one of THOSE that thinks if you don't quilt your own quilt, you can't lay claim to making the quilt. WHO AM I TO ARGUE with Eleanor Burns - who "quilts with her credit card!" Problem is, my credit cards are all gone, and we live on cash only.....when I think about shelling out cash to someone else to quilt, well............I would rather buy fabric!


Well, I have quickly gotten to the point of having several quilt tops sitting in my studio, un-quilted. I am DETERMINED to learn to quilt them myself. The perfectionist in me though, won't let me start them! This too goes against the teaching of most free motion quilting teachers....their advice is always practice, practice, practice. and even practice on real quilt tops (GASP!!!) What if I mess it up? Well, if they site there an never get quilted, what good are they anyway?!? (<---those are exclamations of ambivalence.)


This month's free motion quilting challenge with SewCalGal was feathers....who doesn't love them? I know I love them. I tried drawing them, and when you look at them at a distance, some of them weren't too bad, but again, the perfectionist in me reared its ugly head. I had to use a template. Besides, Diane said we could! Okay, so she was encouraging and teach complete free motion, but she did mention templates at one point, so I took that as complete permission.


This template is from one of my absolute most favoritist free quilting template locations.....forestquilting.com - if you haven't been there, be sure to go and collect all of their beautiful free quilting motifs. I used the one called "Feathered Heart Motif"

The pdf says it is for a 12" square, so I needed to reduce it for my 8 1/2" practice piece. To figure out how much to reduce it, I divided my square size, to get the percentage of the original size I needed to print. (The original pattern size 12 divided by 8.5 equals .67 or 67%) On my print settings, I set it to print 67% of original size.

Next, I took my quilt square, and marked the center lines, by folding and marking. I used a light box to align the center lines on my square, with the center mark on the pattern. I then traced once side of my heart. Then I flipped the pattern over, and traced the other side. Note, the disappearing ink pen disappeared too quickly, so I had to revert to the water soluble. The other neat thing about this project is learning to use all those nifty tools I have sunk a lot of money into!

I set my machine up for free motion quilting. This time I spray basted my practice sandwich, as this is a pretty complex motif and I would have a heck of a time working around pens.


I tested my machine out on scrap piece and everything worked fine.....I went to my real piece and YIKES I started having skipped stitches. Since I cleaned my machine, before I started, I knew that wasn't the issue. So, I changed needles - stitching once again worked fine on my scrap piece. Went to my real piece again - and skipped stitches!!! WTH!!!! Yes, I am using expletives, because I HATE reverse sewing.


So, to the internet I go.....since I had a new needle, my machine was clean, my tension was fine on my scrap piece, I couldn't figure out what was happening, then it dawned on my, I had a thicker batting on my scrap piece!! I found Diane's advice about skipped stitches in free motion quilting here - and made a new "scrap piece" using the same skinny batting, and voila - problem of skipped stitches solved.

Sorry for the novel here, but I had to get all that out!

Wednesday, January 18, 2012

The quilting tool you never knew you had........

Recently, I happened upon a very handy tool for quilting - I bet you even own one yourself! What's that you might ask? Well...........


It's a plastic serrated knife silly!

What in the world of quilting could you possibly use that for?


Why, for closing safety pins used in basting your quilt of course!
The knife slides easily underneath the pin without damaging the fabric, and without your fingers being pricked by the point of the pin. In addition, the serrated teeth grab the pin, so that it is extremely easy to navigate the closure. Try it - I guarantee it, or your money back!


OR you could spend the $8.99 suggested retail on something like this:

Money spent elsewhere = missed fabric opportunities!!!!


"Necessity is the mother of invention" - Unknown

Wednesday, September 14, 2011

Halloween Mug Rug

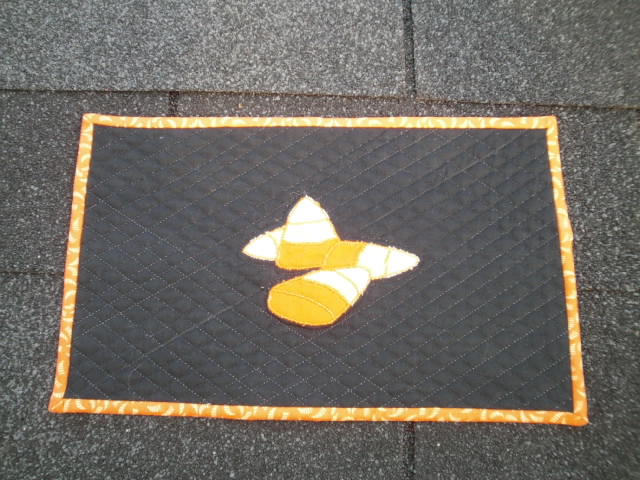
No it isn't Monday, and depending on how you look at it, I am either really late, or really early for the next Mug Rug Monday. However, I was so excited with how this Halloween Mug Rug turned out, that I couldn't wait!


Here is the first of (maybe) four Halloween Mug Rug patterns. I even digitized the applique pattern for my embroidery machine!


Here is a closeup of the candy corn, since colors faded a bit on my full shots taken outside.....

As always, I am providing the mug rug pattern and even the candy corn machine embroidery design free to you, so keep reading.......

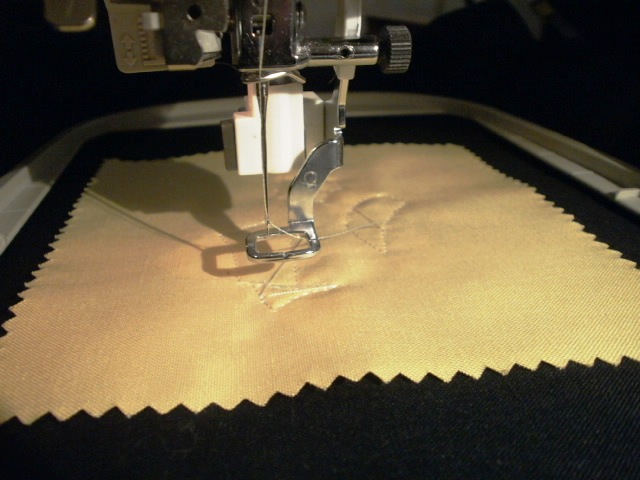
Hoop the black fabric and stabilizer (I used cut away) into a 5 x 7 (or larger) hoop. Load the black fabric/stabilizer only into the machine and stitch your layout outline (1st thread color.)

Now get ready to tack down the top color (I used white) of your candy corn. For each of the three colors in the candy corn, I used a single charm square. It is the perfect size for this pattern. One charm square covers the whole area and each segment of that color is tacked down in one step.


 After stitching the tack down stitches for a color, trim away.
Those stitches you see on the black background are the layout stitches that sewed out in the first step. They show you where to lay your fabric for tacking down.


 Be sure to trim all of your jump stitches between each step. Also, trim your applique as close to the seam line as possible. Applique or curved clipping scissors are a must for this project!

Repeat the process with the middle (second) color.

Note that I did not glue or baste my charm squares, I simply laid them down on top of the design and had no problems with them bunching up or flipping around. I was pleased with the ease of stitching out this pattern.
I used yellow in the middle, but I think that the orange was supposed to go in the middle and yellow on bottom. Oh well, no one can say this isn't original!

Once you have clipped the middle color pieces and all of the jump stitches, reload the hoop on your machine.

It's time for the tack down of the third and final color (orange in my case) on the bottom.

After you have trimmed the final color pieces and jump stitches, reload the hoop into the machine and get ready for the applique stitching around the edges.


Again, be sure to trim as close to the tack down stitches as possible, so that you don't end up with any frayed edges as you see in this photo.I have made adjustments to my design to help, but you still have to trim well.
 Sandwich and quilt your applique design.


Bind as desired and there you have it! I am going let my daughter take this one to her teacher, along with a jar of candy corn.

 I am uploading the candy corn outline here, for those of you who want to do traditional applique or don't want to use the machine embroidery design.

If you would like the free machine embroidery design, I ask that you be a follower and leave me a comment telling me which design format you need for your machine. I will e-mail you the design file. If you don't know what type of file you need, tell me what brand machine you have.

Brief jargon: You may share a link to this blog for you friends to get the free patterns as well, but please do not give or loan anyone the patterns directly, without my written permission. If this pattern goes out two times or a million times, I want to know about it - that is my encouragement and my "payment."

Stay tuned, another Halloween design is just around the corner - I couldn't leave my son's teacher without a Halloween treat could I?

Until then, Piece!
Michele
Monday, June 20, 2011

Mug Rug Monday - Free Motion Quilting

Today's free mug rug pattern is all about free motion quilting! If you have never done free motion quilting, or you want more practice, this is an excellent project. I started with a Mandala drawing I found online. If you don't like the one I have chosen, you can find 1000's of them just by googling the words free Mandala. First, I sized the Mandala correctly and I printed the Mandala on a plain piece of paper - this helped me know where to position the paper in the next step.
 Next, I cut a piece of freezer paper a little larger than the actual Mandala drawing. It doesn't have to be neat, just bigger.
 Next, I ironed that piece of freezer paper onto the top of the Mandala I just printed. I used a medium setting on my iron for this step.
 Here you can see the freezer paper on top of the original printout. Next, place the paper into your printer, being careful to position it so that it prints the same was as it did before - thus hitting the freezer paper target.
 You now have your design printed on the paper side of the freezer paper. Remove it from the printer paper.

 Make a quilt sandwich larger than you want your finished mug rug to be - I made mine 10 x 7. Get your machine setup for free motion quilting. [Correct foot, quilting table, threads of choice, lower feed dogs, etc.] Baste around the outer edges of the sandwich to hold it in place. While you are basting, make sure that your tension is perfect, so you don't have to worry about it when you start your free motion quilting.
 Center you freezer paper image onto your working area.
 IMPORTANT - use a pressing sheet to protect your iron.......Iron the image to your mug rug top.
Following the design on the freezer paper, begin free motion quilting through the freezer paper. Pay attention that you don't miss any spots. If you do though, you can fix it after you remove the paper if it is noticeable.

Relax and have fun with the quilting - this is a mug rug - it is a learning experience! Your thread line will NOT match the drawing exactly, but once you remove the drawing you won't know where the original drawing lines were. Use a little creative license as well, you don't have to use every single aspect of the drawing - for instance I didn't even attempt to do anything with the dots - too tedious!

If you don't believe me, take if from a professional - I took a class with Sue Nickels once and she doesn't always match the line either - and she has one some amazing quilting ribbons and prizes!
Now, wasn't that fun! Next, remove the freezer paper from you mug rug. Tear off the biggest parts first, then sit down in from of the TV with a pair of tweezers or anything else that helps you finish the task of removing the freezer paper.


When you finish picking the freezer paper off, your studio floor might look something like this. ;-)


 The back of your mug rug will look something like this......


And the front might look a little like this:


Remember, these mug rugs are about building our skills. Don't write this one off until you try it! The quilting part is a lot of fun.

Until next time - Piece!
Michele Hester

Beautiful Classic Floral Spray - Machine Embroidery Design

Click here for machine embroidery file Watch this design come to life on your fabric canvas. This gorgeous design has been thoughtfu...