Monday, February 22, 2016

May I show you my backside?


Of my quilt in progress silly!  Remember this quilt top?

I used the leftover half square triangles from the blue/white X squares that look like this:


Seemingly insignificant right? How many times have you thrown away these scraps?

We'll  instead of throwing them away - I made these!


These will be on the back side of this quilt. Each blue/white half square triangle is 1 inch...the total pieced star part of this block is 4 3/4". It was fun to see these come together....what will you do with your scraps?


Embroidered quilt labels


We are hanging our annual quilt show tomorrow at the Rome, GA library.  It is always so exciting to see the quilts adorn the walls and staircase.  In preparation, I needed to label my two quilts that will be hanging.  I made them using my embroidery machine.  I went ahead and made 4 of them, so I guess that means I am committed to two more finishes in 2014!


I used fusible webbing on the back, so all I had to do was iron it on.....have I ever mentioned how much I hate handwork?


Sunday, January 17, 2016

Sewing corner to corner NO MARKING

Whether you are joing pieces for binding, making half square triangles or snowball blocks, any time you need to sew corner to corner, this video has a fantastic tip. The video is filled with other great tips too, I just thought the last one was the best and will to be a huge time saver.


Monday, January 4, 2016

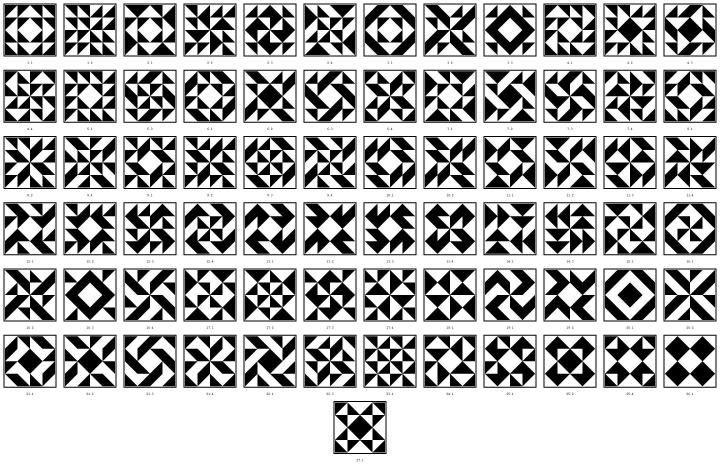
Half square triangles

CLICK IMAGE TO GO TO THE ORIGINAL SITE copyright 1994 Mark Jason Dominus
This variation of 72 different squares using half square triangles has been around for a while, but every time I look for it I have trouble, so I am posting here for you and for me!

Saturday, January 2, 2016

On the frame.........

Gads, I can't believe that I am just now getting around to quilting a top that has been waiting since 2011! Millie and I are working on String Jean, a flimsie that has been waiting on me to decide how I wanted to quilt it. (I had to look it up to see how old she was and I am astonished that String Jean has been a flimsie since January 2011!)


Part of the reason it has been waiting so long is that it I couldn't decide how I wanted to quilt it. Perfectionism is the number one cause of procrastination......

I finaly just got started - and I love how it is turning out.

.


Here are some photos of how I made it. I started with scraps of flour sacks that a friend gave me. I received them exactly as they are in this photo.


I cut white strips the exact same width and added them on both ends.....


Sewed those together and added extra wide white spaces between......


And String Jean was the result. My friend who gave me the strips name is Jean....

Now I just have to figure out what to use to bind it. I with I had some more flour sack scraps!


Monday, December 14, 2015

The quilting tool you probably already own..........but didn't know about

Recently, I happened upon a very handy tool for quilting - I bet you even own one yourself! What's that you might ask? Well...........


It's a plastic serrated knife silly!

What in the world of quilting could you possibly use that for?


Why, for closing safety pins used in basting your quilt of course!

The knife slides easily underneath the pin without damaging the fabric, and without your fingers being pricked by the point of the pin. In addition, the serrated teeth grab the pin, so that it is extremely easy to navigate the closure. Try it - I guarantee it, or your money back!


OR you could spend the $8.99 suggested retail on something like this:

Money spent elsewhere = missed fabric opportunities!!!!


"Necessity is the mother of invention" - Unknown

Monday, December 7, 2015

Amish Bars - mug rug pattern - free

Today's free mug rug pattern is my interpretation of an antique quilt found in the collection of the International Quilt Study Center & Museum. If you have not had a chance to visit their website, please make sure to visit. They have a collection of over 3500 quilts - most of which you can view online....talk about eye candy!

Anyway, the quilt I used is an Amish Bars/Strippie quilt that is estimated to have been made 1890 and 1910 in Pennsylvania. Here is a link to the photo of the original quilt, found on the International Quilt Study Center & Museum site and here is a link to the detailed quilt information. I hope that you will enjoy making it.

So, here is my interpretation - albeit tiny in comparison and squinched in the middle to make a mug rug:


The finished size of this mug rug is 8 1/2" by 6 1/2" and it uses 3 fabrics. From what I can tell, the original quilt was Dark Red, Salmon Pink and Off-white. Obviously, you can make yours any color you choose. Here are the traditional piecing instructions:

 
Cutting Instructions:
All measurements include 1/4" wide seam allowances.
From the Dark Red Fabric, cut:
  • 1 strip 1" x 18" long 
    • Cross cut into:
      • 2 strips 3 1/2" long
      • 2 strips 5 1/2" long
  • For the backing - One 9" x 7" rectangle
  • For the binding - One 1-1/2" x 45" (or width of fabric)
From the Salmon Pink fabric:
  • 1 strip 1 1/2" x 29"
    • Cross cut into:
      • 2 strips 6 1/2" long
      • 2 strips 4 1/2" long
      • 2 strips 3 1/2" long
From the off-white fabric, cut:
  • 1 strip 1 1/2" x  16 1/2"
    • Cross cut into:
      • 3 strips 3 1/2" long
      • 4 squares 1 1/2"
  • 1 strip 1" x 4"
    • Cross cut into:
      • 4 squares 1"
Constructing the top:
Make center vertical bar block:
  1. Using all 3 1/2" x 1 1/2" strips - starting and ending with off-white, alternate sewing off-white and salmon pink strips long-sides together.
  2. Press toward salmon pink.
  3. Block should measure 5 1/2" x 3 1/2"

Add inner border:
  1. Add dark red 3 1/2" by 1" strips to each end of vertical bar block.
  2. Construct top and bottom inner border pieces by sewing two off-white 1" squares to both ends of a dark red 1" x 5 1/2"strip.
  3. Sew top and bottom inner border pieces to the top and bottom of the vertical bar block, which already has inner border attached at ends.
  4. Top should now measure 4 ½” x 6 ½”.

Add outer border:
  1. Sew left and right end of outer border to left and right ends of inner border.
  2. Construct top and bottom outer border pieces by sewing two off-white 1 1/2" squares to each end of 1 1/2" x 6 1/2" salmon pink
  3. Attach top and bottom outer border pieces to middle section.
  4. Top should now measure 8 ½” x 6 ½”

Finishing:
Sandwich, quilt and bind as desired.


That's it! Please enjoy this pattern, but as with all my patterns, please do not copy or use any portion other than for your personal use in making a mug rug. If you want to share it with friends, please send them a link to my blog.
May your bobbin always be full!
Michele Hester

Beautiful Classic Floral Spray - Machine Embroidery Design

Click here for machine embroidery file Watch this design come to life on your fabric canvas. This gorgeous design has been thoughtfu...