Monday, January 4, 2016

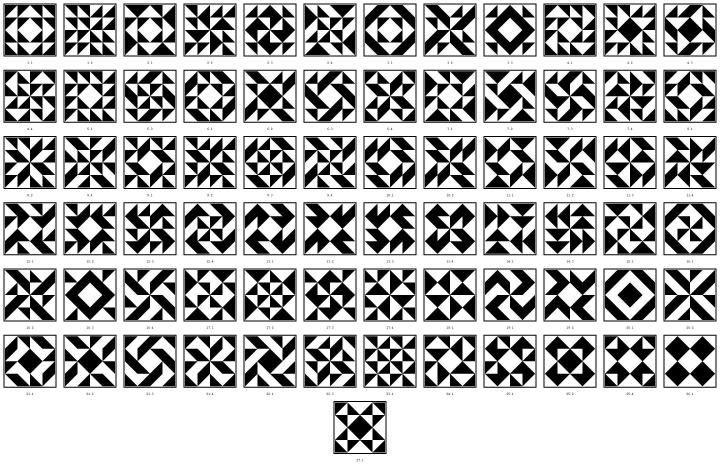
Half square triangles

CLICK IMAGE TO GO TO THE ORIGINAL SITE copyright 1994 Mark Jason Dominus
This variation of 72 different squares using half square triangles has been around for a while, but every time I look for it I have trouble, so I am posting here for you and for me!

Saturday, January 2, 2016

On the frame.........

Gads, I can't believe that I am just now getting around to quilting a top that has been waiting since 2011! Millie and I are working on String Jean, a flimsie that has been waiting on me to decide how I wanted to quilt it. (I had to look it up to see how old she was and I am astonished that String Jean has been a flimsie since January 2011!)


Part of the reason it has been waiting so long is that it I couldn't decide how I wanted to quilt it. Perfectionism is the number one cause of procrastination......

I finaly just got started - and I love how it is turning out.

.


Here are some photos of how I made it. I started with scraps of flour sacks that a friend gave me. I received them exactly as they are in this photo.


I cut white strips the exact same width and added them on both ends.....


Sewed those together and added extra wide white spaces between......


And String Jean was the result. My friend who gave me the strips name is Jean....

Now I just have to figure out what to use to bind it. I with I had some more flour sack scraps!


Monday, December 14, 2015

The quilting tool you probably already own..........but didn't know about

Recently, I happened upon a very handy tool for quilting - I bet you even own one yourself! What's that you might ask? Well...........


It's a plastic serrated knife silly!

What in the world of quilting could you possibly use that for?


Why, for closing safety pins used in basting your quilt of course!

The knife slides easily underneath the pin without damaging the fabric, and without your fingers being pricked by the point of the pin. In addition, the serrated teeth grab the pin, so that it is extremely easy to navigate the closure. Try it - I guarantee it, or your money back!


OR you could spend the $8.99 suggested retail on something like this:

Money spent elsewhere = missed fabric opportunities!!!!


"Necessity is the mother of invention" - Unknown

Monday, December 7, 2015

Amish Bars - mug rug pattern - free

Today's free mug rug pattern is my interpretation of an antique quilt found in the collection of the International Quilt Study Center & Museum. If you have not had a chance to visit their website, please make sure to visit. They have a collection of over 3500 quilts - most of which you can view online....talk about eye candy!

Anyway, the quilt I used is an Amish Bars/Strippie quilt that is estimated to have been made 1890 and 1910 in Pennsylvania. Here is a link to the photo of the original quilt, found on the International Quilt Study Center & Museum site and here is a link to the detailed quilt information. I hope that you will enjoy making it.

So, here is my interpretation - albeit tiny in comparison and squinched in the middle to make a mug rug:


The finished size of this mug rug is 8 1/2" by 6 1/2" and it uses 3 fabrics. From what I can tell, the original quilt was Dark Red, Salmon Pink and Off-white. Obviously, you can make yours any color you choose. Here are the traditional piecing instructions:

 
Cutting Instructions:
All measurements include 1/4" wide seam allowances.
From the Dark Red Fabric, cut:
  • 1 strip 1" x 18" long 
    • Cross cut into:
      • 2 strips 3 1/2" long
      • 2 strips 5 1/2" long
  • For the backing - One 9" x 7" rectangle
  • For the binding - One 1-1/2" x 45" (or width of fabric)
From the Salmon Pink fabric:
  • 1 strip 1 1/2" x 29"
    • Cross cut into:
      • 2 strips 6 1/2" long
      • 2 strips 4 1/2" long
      • 2 strips 3 1/2" long
From the off-white fabric, cut:
  • 1 strip 1 1/2" x  16 1/2"
    • Cross cut into:
      • 3 strips 3 1/2" long
      • 4 squares 1 1/2"
  • 1 strip 1" x 4"
    • Cross cut into:
      • 4 squares 1"
Constructing the top:
Make center vertical bar block:
  1. Using all 3 1/2" x 1 1/2" strips - starting and ending with off-white, alternate sewing off-white and salmon pink strips long-sides together.
  2. Press toward salmon pink.
  3. Block should measure 5 1/2" x 3 1/2"

Add inner border:
  1. Add dark red 3 1/2" by 1" strips to each end of vertical bar block.
  2. Construct top and bottom inner border pieces by sewing two off-white 1" squares to both ends of a dark red 1" x 5 1/2"strip.
  3. Sew top and bottom inner border pieces to the top and bottom of the vertical bar block, which already has inner border attached at ends.
  4. Top should now measure 4 ½” x 6 ½”.

Add outer border:
  1. Sew left and right end of outer border to left and right ends of inner border.
  2. Construct top and bottom outer border pieces by sewing two off-white 1 1/2" squares to each end of 1 1/2" x 6 1/2" salmon pink
  3. Attach top and bottom outer border pieces to middle section.
  4. Top should now measure 8 ½” x 6 ½”

Finishing:
Sandwich, quilt and bind as desired.


That's it! Please enjoy this pattern, but as with all my patterns, please do not copy or use any portion other than for your personal use in making a mug rug. If you want to share it with friends, please send them a link to my blog.
May your bobbin always be full!
Michele Hester

Saturday, November 28, 2015

Got Jelly Rolls? Free quilt pattern

Click here to get the pattern.....


This is one of my favorite free patterns that uses Jelly Rolls! It is called Jelly Roll Strip Starburst by Kimberly Einmo. I have a few jelly rolls sitting around, so I think I will try this one. Isn't it gorgeous?!


Saturday, October 10, 2015

Butterly/Flower Mug Rug

Click here to get the pattern
Spring weather is notoriously unpredictable. On some mornings you might still need a piping hot mug of coffee or tea to start your day. This Flower and Butterfly Mug Rug is perfect for your coffee table or desk. It's a reminder that even when you're shivering over your morning cup of joe, the outside temperature is bound to rise. You'll have so much fun piecing together this quilted mug rug that you might want to make some for your friends as well.


This pattern is now available on Craftsy.

Tuesday, September 29, 2015

Free Motion Quilting - Feathers

Sometimes free motion quilting can be so frustrating! The problem is, I am a perfectionist. I also am one of THOSE that thinks if you don't quilt your own quilt, you can't lay claim to making the quilt. WHO AM I TO ARGUE with Eleanor Burns - who "quilts with her credit card!" Problem is, my credit cards are all gone, and we live on cash only.....when I think about shelling out cash to someone else to quilt, well............I would rather buy fabric!


I have quickly gotten to the point of having several quilt tops sitting in my studio, un-quilted. I am DETERMINED to learn to quilt them myself. The perfectionist in me though, won't let me start them! This too goes against the teaching of most free motion quilting teachers....their advice is always practice, practice, practice. and even practice on real quilt tops (GASP!!!) What if I mess it up? Well, if they site there an never get quilted, what good are they anyway?!? (<---those are exclamations of ambivalence.)


I participate in a challenge recently that was all about free motion quilting feathers....who doesn't love them? I know I love them. I tried drawing them, and when you look at them at a distance, some of them weren't too bad, but again, the perfectionist in me reared its ugly head. I had to use a template. A template?! - Diane Gaudinski said we could! Okay, so she might have only mentioned templates, but I took that as complete permission.


This template is from one of my absolute most favoritist free quilting template locations.....forestquilting.com - if you haven't been there, be sure to go and collect all of their beautiful free quilting motifs. I used the one called "Feathered Heart Motif"

The pdf says it is for a 12" square, so I needed to reduce it for my 8 1/2" practice piece. To figure out how much to reduce it, I divided my square size, to get the percentage of the original size I needed to print. (The original pattern size 12 divided by 8.5 equals .67 or 67%) On my print settings, I set it to print 67% of original size.

Next, I took my quilt square, and marked the center lines, by folding and marking. I used a light box to align the center lines on my square, with the center mark on the pattern. I then traced once side of my heart. Then I flipped the pattern over, and traced the other side. Note, the disappearing ink pen disappeared too quickly, so I had to revert to the water soluble. The other neat thing about this project is learning to use all those nifty tools I have sunk a lot of money into!

I set my machine up for free motion quilting. This time I spray basted my practice sandwich, as this is a pretty complex motif and I would have a heck of a time working around pens.


I tested my machine out on scrap piece and everything worked fine.....I went to my real piece and YIKES I started having skipped stitches. Since I cleaned my machine, before I started, I knew that wasn't the issue. So, I changed needles - stitching once again worked fine on my scrap piece. Went to my real piece again - and skipped stitches!!! WTH!!!! Yes, I am using expletives, because I HATE reverse sewing.


So, to the internet I go.....since I had a new needle, my machine was clean, my tension was fine on my scrap piece, I couldn't figure out what was happening, then it dawned on my, I had a thicker batting on my scrap piece!! I found Diane's advice about skipped stitches in free motion quilting here - and made a new "scrap piece" using the same skinny batting, and voila - problem of skipped stitches solved.

Sorry for the novel here, but I had to get all that out!

NOTE BENE: this is a repost of one of my popular posts in the past. I have since purchased a long-arm, and as you can see from some of my other posts, I have gotten quite a bit of practice since this originally posted. I still think it has valuable information in it, so I wanted to repost for my new followers.
Beautiful Classic Floral Spray - Machine Embroidery Design

Click here for machine embroidery file Watch this design come to life on your fabric canvas. This gorgeous design has been thoughtfu...