Anyone from the Atlanta area knows what a H.E.R.O. (Highway Emergency Response Operator) is....they began in Atlanta in the mid 90s as a force of civil servants to help with the traffic problems in Atlanta. Their primary job is to keep major interstates free of congestion. Often this means sitting in the middle of the interstate to redirect traffic around road hazards/accidents as they are quickly cleared. At other times this job entails the simple act of changing a tire, giving gasoline or jumping off a dead car. The simple act of jumping off a battery ended in the death of a H.E.R.O. today. This is the first death ever in the history of the organization. This is the death of a family member, because my husband manages the H.E.R.O. units in Atlanta. He has been doing this job for many years now and considers everyone of the H.E.R.O operators to be family. At 11:45 this morning my husband called me to share the worst news in the history of his career, a fellow H.E.R.O. had been killed in the line of duty.
Please pray for the family of Spencer Pass. He was a Christian and is in Heaven today, but his family is left behind to grieve his loss. He had a wife and 4 children. One of his sons (age 19) is set to deploy with the U.S. Army in December. Pray for his fellow H.E.R.O. workers as they are suffering the loss of a "family" member as well.
Michele Hester
Monday, January 31, 2011
Sunday, January 30, 2011
Giveaways page added......
Rather than cluttering everyone's readers with giveaways on a regular basis, I added a giveaway page to my blog. At the top of my blog you will see a tab for GIVEAWAYS - click on it for a current list of giveaways. I will try to remind you to check it every now and then.....
Michele Hester
Michele Hester
Saturday, January 29, 2011
But I NEEDED white fabric...........
Hubby went with me to the fabric store today, on our way for a hot date.....I needed to get some white fabric to use on a new quilt that I just designed and wanted to start on tomorrow - more on that to come. So anyway, here is what I got:
Hmmmm.........only one white and one pink, won't they be lonely? Maybe I should go back and get them some friends!
Back to the reason I was getting the white fabric - I have designed a new quilt that I will be starting hopefully tomorrow. I have failed miserably so far, in fulfilling the namesake of this blog, so I am going to make this my first official tutorial. I will be writing a tutorial and sharing the pattern for this quilt as I go. It is a traditionally pieced quilt, that will be fairly simple. I have already laid out the quilting motifs for it as well (which I will share too!) Please join me and please let your friends know about it.
See you soon!
P.S. A little birdie told me that there would be a great giveaway when we reach 50 followers on this blog, so spread the word. ;-)
 |
| Two Greens |
 |
| Two Oranges |
 |
| Two Yellows |
 |
| One Pink |
 |
| Two Blacks |
 |
| One White |
Hmmmm.........only one white and one pink, won't they be lonely? Maybe I should go back and get them some friends!
Back to the reason I was getting the white fabric - I have designed a new quilt that I will be starting hopefully tomorrow. I have failed miserably so far, in fulfilling the namesake of this blog, so I am going to make this my first official tutorial. I will be writing a tutorial and sharing the pattern for this quilt as I go. It is a traditionally pieced quilt, that will be fairly simple. I have already laid out the quilting motifs for it as well (which I will share too!) Please join me and please let your friends know about it.
See you soon!
Michele Hester
P.S. A little birdie told me that there would be a great giveaway when we reach 50 followers on this blog, so spread the word. ;-)
Wednesday, January 26, 2011
String Jean is done!
The top is anyway.......
 any volunteers for quilting? I can see great things happening in all that white space! Oh, and remember I said it was going to be a lap quilt, well it is probably a little larger, but I liked the aded white space, rather than all of the strips so close togther.


Do you think my friend Jean will be proud of what I did with her scraps?
Michele


Do you think my friend Jean will be proud of what I did with her scraps?
Michele
NOT a pretty picture........
when you consider the fence is surrounding my soon to be hopefully prolific vegetable garden...............

they must hear the pages of my seed catalogs turning!

they must hear the pages of my seed catalogs turning!
Tuesday, January 25, 2011
Mug Rug #2 - Different Binding
Here is mug rug number 2......I tried a different edge finish this time. Not sure I like it, but it was easier than traditional binding. I am going to master the traditional binding on this small scale if it kills me!


Friday, January 21, 2011
Mug Rug Lessons Learned - and Bobbin Washers
Here is my first mug rug.....

It isn't my best work, but it was sort of fun....I say sort of, because I did a lot of reverse quilting on this one.....I couldn't get the tension right on my machine...and of course, rather than taking the time to work it out on a sample, I kept trying to fix while doing the project. More time was spent fixing the mistakes, than had I taken the time to work on a sample - I just hate wasting fabric (pitiful I know.) Anyway, I finally figured out that the problem with my tension was the Magic Bobbin Washer thingy! Once I removed it, I had no more problems with the tension.
Then, thinking small quilt, I made my binding too narrow, so I had to remove it and redo it....still a little on the small side, but all-in-all I think it came out okay....
Mug rugs are definitely a good practice model for larger quilts. It FORCES you to use the good habits needed for great quilts.
Have a great day!
P.S. I will say though, that I probably wouldn't recommend the bobbin washer for baby lock machines.
Sunday, January 16, 2011
My first fabric postcard
Typically when a member of our guild has a serious illness we make them a quilt. We have a member ill now who "has too many quilts" - HUH? Isn't that like having too many shoes or too much chocolate? Anyway, we decided to make fabric postcards for her. The first one is mine and I have attached photos of a few others as well. They were really fun to make and quick gratification. If you haven't already, you try one.


String Jean
My friend Jean gave me some strings she had leftover from a flour sack quilt that she made it. She is a tongue-in-cheek kind of person, so I think she will enjoy my newest quilt I am making and naming in her honor. Here are the strips as I received them:

Because I consider the antique fabrics to be "collectibles"of sorts, I didn't want to cut them up anymore than they were. I left them the exact lengths that she gave me and added white strips to the top and bottom to make the full length of the strings approximately 65 inches. Here are the strings completed so far on my design wall.

I intend for this to be a lightweight lap quilt to use in the spring - what do you think?
Monday, January 10, 2011
My current project and lots of giveaways.........
Well, it is snowing again here in GA....we got about 6 inches last night and it is gorgeous. I am working on a new quilt with scraps of old flour sacks that a friend gave to me. I am also sitting at the hospital waiting for my husband to get out of surgery. Nothing serious - an elective procedure. BUT I don't have all of my usual equipment here to be able to upload photos of the snow. I will try to get you some photos uploaded soon!
For now, here are the giveaways - Good luck!
I have a Notion - Giveaway enter by January 13th.
The Plaid Scottie - celebrating 10,000 hits! Enter by Friday, January 14th.
Quilted Seasons - Winner announced Thursday, January 13th.
Tea & Crumpets - celebrating 500th post. Giveaway ends Friday, January 14th.
The Renegade Quilter - A just because giveaway! You have until Friday, January 14th at midnight to enter this drawing.
Me? A Mom? - giving away a darling little coin purse. Giveaway open until Friday, January 14th.
Thread Head Celebrating one year of posting. Winner will be drawn on Friday, the 14th.
Confessions of a Fabric Addict - celebrating one year of blogging! Winner will be drawn on January 13th.
Projektownia Jednoiglec - celebrating her birthday, 100th post and having 100 followers! Giveaway open until Saturday, January 15.
Wednesday, January 5, 2011
Cheryl Ann’s Design Wall – a non-compensated review…..
Not only did I not get compensated for this review, it cost me a whole glass of diet coke and some elbow grease………let me explain:

This is what it looks like when you take everything out – a little more ominous, but maybe not so bad.

That pile of what looks to be about 100 short black sticks is actually only 8 very long sticks that assemble in the same way the new tent poles come together. They are strung together with an elastic rope and they simple straighten out and clip together. They were easy to put together – about 1 minute to get to this:

I know now that this first easy step is just to build your confidence. I thought to myself - “This isn’t going to be so bad," as I noticed my freshly poured diet coke sitting on the table next to me. Note to self, when you think you should probably get something out of the way – DO IT.
The next step of the instructions is to slide the poles into the four sleeves around the edges of the flannel. The first one goes in, no problem. Just like putting a curtain on a curtain rod. The second one is a little more difficult, as I have to control the first rod. The third one is starting to get a little crazy, with the first two plopping rods around the room. I won’t be hard for you if you have eight arms though.
I began this process in my sewing room, which isn’t particularly small, but it is a little crowded. My hopes was to be able to assemble it in my sewing room as that is where I was going to use it. Also, my thought behind the portable design wall is to be used by those who don’t necessarily have a lot of space. Well, it is very difficult to accomplish in a tight space. (Please note, the diet coke is still standing, I am thirsty, but I put off taking a drink because I want to get this wall put together.) I finally managed to get all four sides of the wall into the sleeves. The next step is to insert the corner brackets, which stabilize the four side poles into a solid square. Well, this whole scene is looking more like the assembly of a 12-man tent, than simple square frame. Just as I got one corner on and moved to the next corner, the prior corner would fall off……you get the picture. I managed to get the whole square put together even with it flopping around the room and my diet coke survives! The next step is to attach the two cross poles to the back. As I pick up the first cross pole and swish it around to put it on the back, you know what happened (warning the following photo is graphic):
 |
| “It can’t be that hard” – said the naive non-camper watching a movie with Dad leading the family in a disastrous attempt to assemble the tent. |
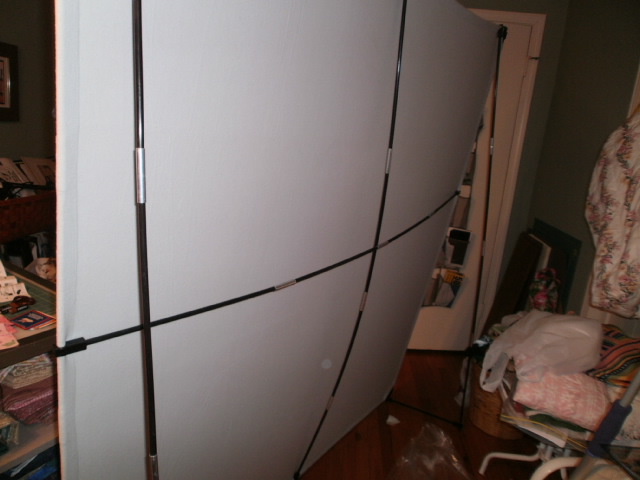
After cleaning up the diet coke, and narrowly missing my lamp and ceiling fan, I decide it is time to take this circus to another room. Transporting the partially assemble wall was no piece of cake. To be fair though, it isn’t designed to be moved around in this partially assembled state. Once I got it to the living room, I was able to finalize the assembly (still very much a campsite scene) and move it to my sewing room…..TADA!

I can’t really get a picture of the whole thing as it is now really tight in my sewing room, but notice how close it comes to the ceiling!Older reviews on this design wall expressed concern over the wall knocking over and not being stable. This newer model has stabilizer bars included with it. The following picture shows the stabilizer bars at the floor. I can see how it would topple without these bars.

As I put my UFO onto the wall, it did wiggle quite a bit, but it stood its ground. The quilt square seem to stay fairly well attached. As I mentioned earlier, one thing that drew me to this was the ability to build my quilt sandwiches on this wall. Well you can also use a temporary spray adhesive to secures your squares to it as well. The flannel is completely washable.

Would I return it? Probably not. Would I buy it again? Not sure, I will let you know after I attempt my first quilt sandwich. Would I attempt to assemble it by myself again? NEVER!
Now, I am off to drink my new diet coke and finish this UFO – blendable curves technique/design by Peggy Barkle.
Subscribe to:
Posts (Atom)
Beautiful Classic Floral Spray - Machine Embroidery Design
Click here for machine embroidery file Watch this design come to life on your fabric canvas. This gorgeous design has been thoughtfu...

-
 Click here for the machine embroidery files and instructions This machine quilted in the hoop machine embroidery design is a quick and f...
 -
 This year's Christmas Quilt Show is a celebration for me in more than one way! I have now officially been positing in blogland for one...
 -
Petit Design Co has done a 31 day series on quilting with a walking foot.........think it is just straight lines? NOPE - she includes curv...
